Showing posts with label garage. Show all posts

Friday, September 16, 2016

Organizing an Upright Freezer {Garage Freezer}

Right as we were getting into our kitchen renovation, while my husband was away on a business trip for a week, our downstairs fridge/freezer died! We have a lot of people over and feed a lot of people, plus I like to buy in bulk, so our downstairs freezer is vitally important. I knew it could go anytime, as we had problems with it. It was "only" 15 years old but we loved it as it had a TOP fridge and BOTTOM freezer and they don't make those anymore, sadly. So, we had to explore some new options, and fast. 

Organizing an Upright Freezer {Garage Freezer} :: OrganizingMadeFun.com

Friday, May 22, 2015

15 MORE Simple and Easy Organizing Ideas

Organizing Ideas are so much fun to share and to see! Aren't they? It's like the most simple things sometimes just spark motivation, knowing you can do something simple, like these ideas I've posted on Instagram, that you can do to organize your home and life.


20 SUPER easy organizing ideas :: OrganizingMadeFun.com

Tuesday, January 13, 2015

My Best DIY Projects Ever!

I LOVE to do DIY projects. I LOVE spray paint. I LOVE to decorate and transform spaces in my home, especially. Do you? I was looking back through all my projects I've done over the last 4 1/2 years and I know that you might enjoy seeing what I've done. Perhaps you've never even seen them since you're newer to Organizing Made Fun. But, I'm a spray painting queen! Ha! I love that stuff. And, I like changing things up - I love color and patterns!


The BEST do it yourself projects for the home :: OrganizingMadeFun.com

Tuesday, December 30, 2014

25 of My Best Organizing Hacks!

What is a "hack" - as in organizing hack? It's modifying or customizing everyday {organizing} ideas to improve their functionality. So, I thought that showing you the best organizing hacks that I've ever done would be a fun way to start the year! Here are 25 of them!


25 of My Best Organizing Hacks:: OrganizingMadeFun.com


Thursday, December 18, 2014

Big Bear Shelving Solution + Giveaway

Big Bear Shelving Solution asked me to try out their shelving brackets. We have already done our whole garage in shelving and did not have another area to use them in our home. So, my assistant, Tiffany, had an opportunity to try out these shelving brackets and is sharing her experience! THEN, you'll get a chance to win a set for yourself - just in time for the new year and getting organized! So, click over and enter and learn more about this great shelving system for your garage or space!

Big Bear Shelving Bracket Giveaway :: OrganizingMadeFun.com

Monday, May 5, 2014

11 Ways to Organize with Magnets!

Everytime I look around my house, I notice that there are more and more ways I've been organizing with magnets! Yes, magnets! Think I'm crazy? Well, I've found 11 ways and you can try this inexpensive, easy way to organize, too!


11 Ways to Organize With Magnets :: OrganizingMadeFun.com


Wednesday, February 5, 2014

The WHOLE garage is done + a giveaway

It's done...it's totally, finally, done! The last wall of the garage has been painted and organized...and I am delighted! Probably the last wall of our home that hasn't been painted! 


Organized Garage :: OrganizingMadeFun.com

Friday, January 24, 2014

Garage Organization: Cupboards

Last week I showed you our cupboards that FINALLY got painted and how the garage has slowly been transformed into a recreation room! Well, today I wanted to show a garage organization tip that I use to KEEP the cupboards from getting a mess!


Friday, January 17, 2014

My garage is more organized

Our garage has such a hard life. It's the one area that seems to be organized one minute and a mess the next! How about you?  Since I am only 1/3 of the way done truly getting the garage organized, I decided that I needed to get another third done and painted it a couple of weeks ago.


Friday, August 16, 2013

Behind the scenes of the garage organizing

Cleaning out the garage is like scrubbing your mouth out with soap! It won't kill you, but it's certainly not fun. I want to show you the behind-the-scenes look at my garage organizing because I think it will help you have a realistic idea of what it takes to get your garage cleaned up!


Friday, August 2, 2013

The BIG garage reveal and a BIG giveaway from Flow Wall Systems

Today is the day you are going to see what an amazing garage we now have! A few weeks ago, I showed you where we started from - a mess and needing something to get our garage organized. Then, two weeks ago I showed you our "midway" progress. It wasn't much to show, but it was something. Today is the big reveal and a BIG giveaway from Flow Wall Systems


Friday, July 19, 2013

Operation: Organize the garage {midway}

{I have been paid compensation by Flow Wall Systems to try out their fabulous product}

Last week I showed you our "before" pictures of our garage that is currently in the midst of re-organizing with the Flow Wall Systems


Friday, July 12, 2013

Operation: Organize the Garage is underway!

{I have been paid compensation by Flow Wall Systems to try out their fabulous product}

Well, it was time. Time to let go of some big things, small things, and get this garage looking fabulous. I can't believe how awful it looks. Who here can say their garage is spotless? Well, probably just a handful...and mine is in a constant state of clean - messy - clean -- organize -- not so organized -- messy -- well, you get the story. It is a back and forth organized mess. It's not horrible, but it's not the way I'd like to see it, for sure.


Friday, January 18, 2013

Scooter Stand Organizer

We have a problem with scooters. We only have two children, but we have six scooters. That's on purpose because I like to keep a big supply of them here for all the kids we have over to play at our house -- and I got a GREAT deal on them on Black Friday a couple months ago. So, the problem: keeping the scooters organized, standing up, and from driving us nuts in the garage. 


Friday, August 10, 2012

Organizing the shed and potting bench

I hope you aren't tired of me talking about my potting shed project! If you are, this is the LAST post about it! It has been a fun project. What started off as a great project from Sherwin Williams, turned into a fantastic space for us. Well, mostly me, but it DOES store the lawn mower! So, today I want to show you how I organized everything in there and hope that you can get some ideas for any of your spaces, too!


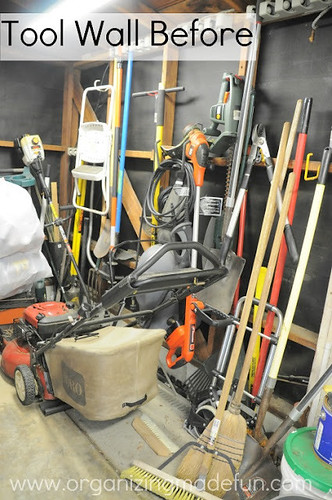
I want to start with the tool wall. It's packed with so much organizing fun because I decided that the old way we stored the tools wasn't working. When we first moved in, I bought these broom organizers that we quickly put up and hung all the shovels and tools on. Well, they did fine for about a year, but I think the tools we had hanging on them were just to heavy and they broke and got warn out. I use the same one in my utility closet and it's fine! 


As you can see I used all kinds of hooks for the tool wall that are strong and sturdy. The wood plank walls can handle these heavy shed tools. The hooks screw right in and have done well at handling their weight. I used much of the old hooks from the old shed and then bought a few more at our hardware store.


My hubby is a genius at electrical and he re-wired the shed with an outlet near the floor so that we could plug in our lawn mower - which has a key start that occasionally needs to be plugged in. 


He also installed extra outlets above the potting bench counter top to charge the many batteries for our re-chargeable blower and trimmer, as well as being able to have an extra phone base on there. He's a keeper, that man! I also put the "charged" batteries in the drawer so we know which ones are ready - cause it's super hard to remember which ones are charged and which aren't.


Across from the tool wall is the wall that adjoins to the garage and it holds this new shelf system that we installed. Noticed I used colored-clear containers. You can see what's inside but it's not that obvious from back a little bit. I put numbers on them for fun and for remembering what goes where. Bin #1 has stuff in it that is just all that extra little stuff that comes with tools and things that you can't throw out {cause you JUST might use it} but you need to keep it! Bin #2 has all kinds of things my hubby wanted to keep {don't even ask me what all is in that}. Bin #3 has my flower and weed stuff. Bin #4 has several gas cans {I've left the top open slightly for ventilation}. It looks SO neat and tidy just sticking all that junk in these containers! By the way, I bought these containers at Kmart for about $6 a piece! Good investment!


I wanted to talk about this shelving. It's from Rubbermaid and is very similar to the Elfa Shelving that I use in our closet systems but costs much less. I bought the pantry kit which is similar to this one HERE. The good features are that it hangs similar to the Elfa system in that it has one horizontal rod that is screwed into the stud and then all the vertical rods hang from that - see HERE how it works. The one thing I don't like about it is that the shelf brackets stick up above the wire shelving. It's not a big deal if you can get your baskets or containers to go around it, but if you can't then they can be annoying. 

Underneath the shelving system I have a large deck box {which I've had for 10+ years} which I use to store all the cushion on our outdoor couch when "winter" comes and I keep them stored inside and on top of the box. Next to the shelf and box I have some other shed items hung and some are on the floor like the pressure washer and my little scooting gardening stool.


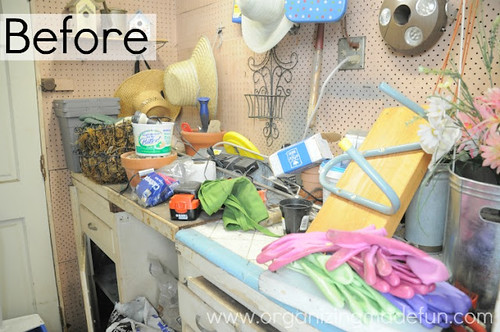
Now I want to turn your attention over to the potting bench area! The pegboard is just fabulous. I love pegboard and plan to use it some more around my house! It's cheap, paintable, and a great way to get things organized! I hung many of my most used tools on it, a clock, a shelf {with leftover scrap wood that I spray painted}, and a gardening hat!  There's really a lot more room on it, but that's probably all I'll put on it for now!


The potting bench itself is made up of two bathroom cabinets screwed together with a door I stained for a counter top. It works really well to hold my potting soil - which I found this great container that fit perfectly onto the chrome slide out organizer {I was able to use a coupon and save 30% at my hardware store}. 


And last, I also have more potting soil for my succulents in a trash can next to the potting bench, along with a small stool for use in the shed. I have several bamboo sticks I use to hold up tall flowers that I store inside a PVC pipe.  Whew! That's it....that's about all you're going to learn or know about the potting shed. Did you miss any part of it? Did you get some good ideas for paint or organizing? I sure hope so....

Before of potting shed
Picking paint colors
Reveal of the most beautiful potting shed ever
Behind the scenes

Pin It
Photobucket 

Like what you see here? Consider becoming a follower or subscribe via email! 

Join me on Facebook - where we interact and have lots of great fun. You can also see behind the scenes pictures and fun stuff I do on my Instagram!

There are some products that are linked to my Amazon affiliate link.

Parties:
Thrifty Decor Chick
TDC Before and After

Monday, July 23, 2012

The most beautiful potting shed EVER!

Are you ready for a huge before and after? Ta-da! Here is the entrance to my potting shed -- it is so beautiful! I showed you last time what colors I decided on and here they are:


It's gorgeous! I can't believe how amazing some old cupboards can look with paint. I took the colors I found with the Chip It! button and picked out the paint colors and they are beautiful! 


Look at the before and after of this potting bench! I got two new bathroom cupboards from Restore. My hubby raised them up and screwed them together. I found a door for the countertop at the same store, cut it down and stained it. It's the perfect surface for potting plants. The pendant light -- snagged for $6 -- was spraypainted to match the Real Red color that inspired me in my reveal. I got brand new pegboard -- we ripped out the old because it was gross and the holes were much smaller. Painting the large "B" (for our last name) made it much more interesting and we used some of the Reflecting Pool color on that, too. Then we organized my tools within the "B."


Here is my super-organized tool wall. We put up 1 x 10 x 8 boards (
20 of them) horizontally all over the walls. I painted them Extra White. Having the walls paneled this way makes them strong and able to support heavy tools.


You'll notice quite a dramatic before and after for this wall. We went through all the tools and got rid of some (though fewer than I'd wanted to). With the wall set up this way it's easier to hang tools in all directions.


The last wall is the shelf wall. Even my accessories here match the color scheme -- with the red cushions and turquoise organizing bins (like the Real Red and Reflection Pool). 


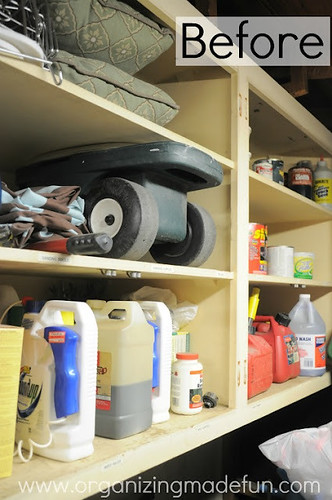
You can see that the old shelves were taken down. They were useless. Having the new, open shelving allowed for the large organizing containers. After a lot of cleaning and giving away, I was able to reduce the number of bins I needed. You can see I have ample space left to add more things. 


So here is how I applied the colors -- see above. I got all the colors I wanted together. It looks amazing! It's like a jewel attached to our garage and makes me want to jump in there and start potting some plants!


What do you think? Do you love it?
Pin It

Photobucket 

Monday, June 18, 2012

My Sad, Sad Shed Is Ready for a Makeover


I want to tell you that the state of my potting shed is sad. Really sad. I DO have an excuse for its current state, but I am hoping to make it a very fun place to be, where I can pot my plants and keep our tools.


Why have I let it get to this state? OK, here are legitimate excuses:

  • I'm not the only one who uses it. Since this is the case, I have seen "someone" leave unexplained tools on my potting counter and never put them away.
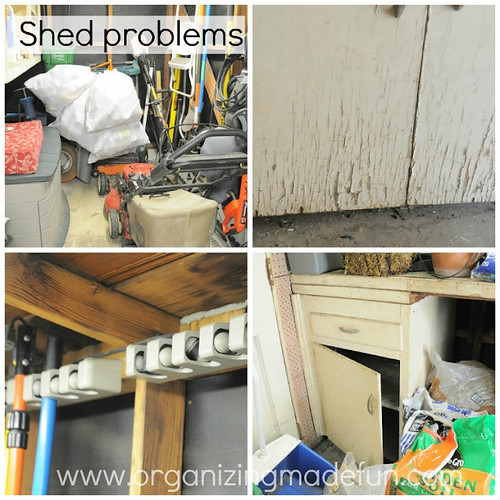
  • We had a roof leak. The water has made a big mess and caused the already old cabinets to be really bad.
  • There are rats in there. Yuck, I know, but that's the truth. I think once I rip out the cabinets I will discover how they are getting in.
  • We got a new roof. When they fixed our roof, an even bigger hole appeared where they covered it with new plywood. It made a big, lovely mess!
  • I need to clearly label things so they get put back properly.


That's it! Now that you know my excuses, I want to share an amazing thing that Sherwin-Williams has. I plan to do some serious improvements in the shed and lots of painting, so this new "tool" is going to help me choose my colors! It's super cool and easy. It's called Chip It!


You see, you can get the Chip It! button just like the Pin It button for Pinterest - and you all KNOW how much I LOVE Pinterest! You drag the Chip It! button to your toolbar: Chip It!
Watch the video on the site and it will show you exactly how to use the Chip It! button - it's super easy!


Whenever you spot a photo you like online, just click the Chip It! button and then click the photo itself. And voila - you get the picture's paint colors. You can use any picture you find online and turn it into your perfect palette!


It's seriously cool. I can go to the Pinterest boards that have inspired me - something with great colors - and just click on the Chip It! button and it comes up with all the paint colors!

Source

{Above} This second inspiration picture, which I also love, is not yet "chipped." It's beautiful, but having the Chip It! button to give me exact colors will make it much easier to narrow down my decor! I haven't figured out exactly what colors to paint in the shed, but I'm thinking fun and bright colors, since the room is so dark and drab.


I want my room to get me feeling like I want to garden. And, I want it to be ORGANIZED nicely, too!


I have some AMAZING ideas for this tiny space, and I'm still deciding on the colors! The walls will look nothing like they do now. The ceiling needs some painting. The cabinet has seen better days...so I plan to get something from the Restore {Habitat for Humanity} and paint it. See that above? Those are all my ideas of colors I'm thinking of, using the Chip It! button to help me decide. {Just so you know, you can save your ChipCards to ChipBooks for later use.} What do you think? What is your favorite color combination?

For a chance to win a $1,000 Visa gift card and a $200 Sherwin-Williams gift card, chip my second inspiration image and guess which photo I'm going to use to make over the shed. {Email Subscribers please click over to the blog and leave a comment to enter.}

Rules:
No duplicate comments.
You may receive (2) total entries by selecting from the following entry methods:
a) Leave a comment in response to the sweepstakes prompt on this post
b) Tweet about this promotion and leave the URL to that tweet in a comment on this post
c) Blog about this promotion and leave the URL to that post in a comment on this post
d) For those with no Twitter or blog, read the official rules to learn about an alternate form of entry.
Entries from all participating blogs will be pooled for winner selection; only two entries per household.
This giveaway is open to US Residents age 18 or older. Winners will be selected via random draw, and will be notified by e-mail. You have 72 hours to get back to me, otherwise a new winner will be selected.
The Official Rules are available here.
This sweepstakes runs from 6/18/2012 to 7/6/2012.
Be sure to visit the Sherwin-Williams brand page on BlogHer.com, where you can read other bloggers’ posts!


Pin It
Photobucket 

 {This post brought to you by Sherwin Williams, who has given me a monetary incentive to tell you about their new program}

Parties:
A Bowl Full of Lemons

Monday, April 9, 2012

Organized Reader: Carol from Are We There Yet


It's time for an Organizer Reader Space! 


Meet Carol from Are we There Yet


Carol is a retired elementary school teacher who loves to decorate, read, scrapbook, take photos, and travel.  She and her husband were full-time RVer's (which is really where the name of my blog came from) until a family emergency took them off the road.  She says "I guess you could say that I am a little OCD - my husband says that I'm A LOT- and that is where my need/love for organization comes from.  I just like the ease of knowing where things are.  To me, it really does not take that much to organize a space once you commit - just take it one step at a time - and your life is so much simpler once it is finished."


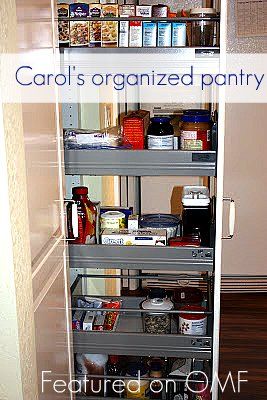
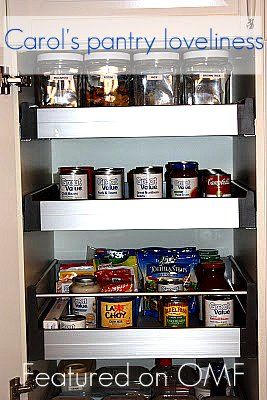
Here is her organized pull-out pantry. I would love to have a pantry like this where you pull it out - so clever. 


And, you know, anything that is organized and lined up pretty, is lovely, too!


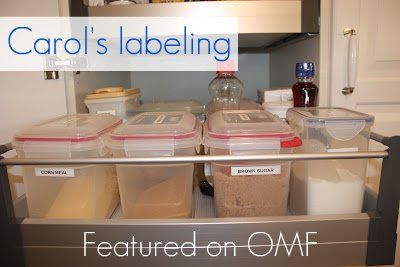
Combine that with labeling and you have a winning combination for a pantry!! Very neat! You should see the before and after of her kitchen, too - amazing difference!


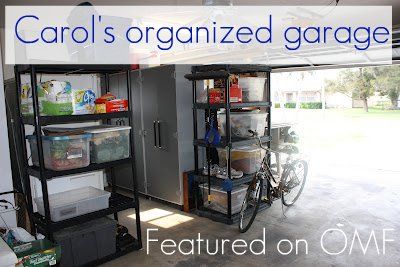
And then there is the garage! Super organized - love all the racks to keep things at bay. And the storage lockers are a great way to divide up the space into two different rooms.


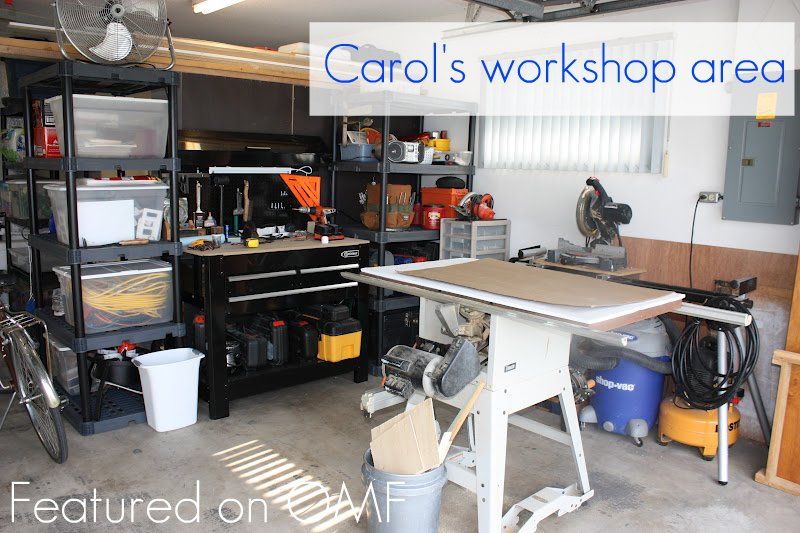
She even has a great workshop area that's super organized!  She's got some more to show - like her freezer, too! Go over and say "hello" to Carol and pin her pictures from her blog!


Are you motivated? Are you inspired? You should be...I certainly am! 


Pin It
Photobucket 

  Like what you see here? Consider becoming a follower or subscribe via email!

Enter your email address:


Delivered by FeedBurner
Follow Me on Pinterest 

Having trouble seeing the pictures? Try THIS.
Are you an Organized Reader? I'd love to see your organized space. Email me HERE and show me your space to possibly be featured as one of my Organized Readers.


Follow my blog with Bloglovin