We spend a lot of time in our family room because, well, it IS the FAMILY room! I've teamed up with the Top Organizing Bloggers to bring you our family rooms this month -- and we want to motivate and inspire you, give you some ideas, on how to get your family room organized and stay that way!
Showing posts sorted by relevance for query family room. Sort by date Show all posts
Monday, November 3, 2014
Friday, November 11, 2016
Welcome to my Organized, Colorful Home
I haven't updated my home tour in awhile so I thought it would be fun to share how my house looks right now, since doing my new kitchen and a few other areas this year. So, I'm going to walk you through the house! If you want to now specifics about that room, just click on the link I provide for each room.
Our front yard got overhauled last year and is now completely drought tolerant and all native. Go HERE to read more about it.
Welcome to our home!
Our front yard got overhauled last year and is now completely drought tolerant and all native. Go HERE to read more about it.
Labels:
backyard,
basement,
bathroom,
bedroom,
entry,
family room,
front entry,
furniture,
garden,
green living,
Home Tour,
Kids,
Laundry,
linen closet,
Motorhome,
Office,
pantry,
projects,
remodel,
RV
Friday, October 18, 2013
Thursday, October 17, 2013
31 Days of Spontaneous Organizing - Day #17: Family/Living Room {cupboards}
Monday, January 21, 2013
We're organizing our living areas and play rooms! Challenge #4
I can't believe how many closets linked up last week! And our sponsors have pulled through and gotten us some great prizes to achieve! Today we're going to organize our living area and play rooms - you might call a family room, living room, or wherever your family hangs out to play the most. But, first:
The winners of last week's closet challenge ARE:
1st place: Tonya of Love of Family and Home with her closet turned office. She won a Closet Maid Closet!!
The winners of last week's closet challenge ARE:
1st place: Tonya of Love of Family and Home with her closet turned office. She won a Closet Maid Closet!!
Friday, January 6, 2012
Curb Appeal update: The layout
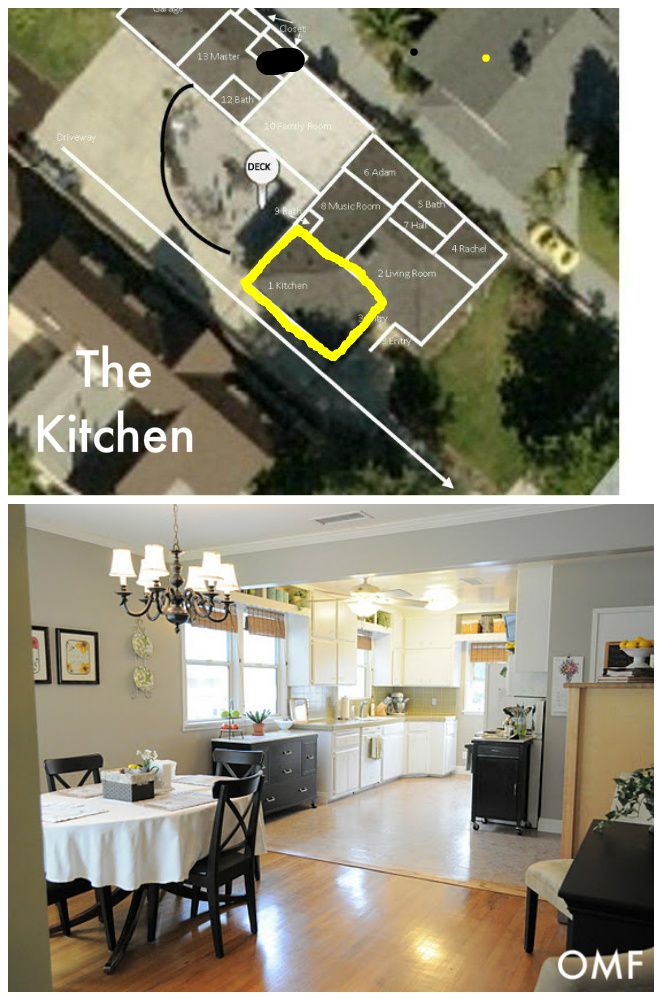
So, we're busy working away on getting the curb appeal looking nice for our house....and boy is the paint job looking AMAZING {did you get a sneak peak on my Facebook page?}! But, I thought for you to better understand my house layout, I'd give you a visual of where things are and how things are laid out. {Home goals towards the end}.
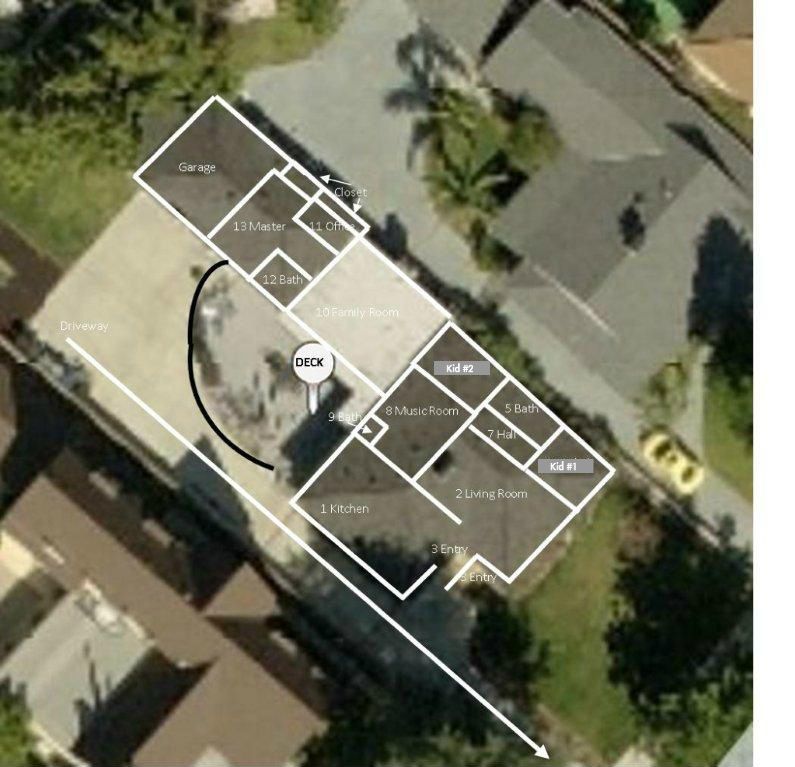
From the street our house looks small, somewhat normal sized. But it's larger than it appears. It's not a mansion or anything {just 2400 square feet} but it has this layout that when you walk through, it seems to go on and on. It's all one level, which I really like.
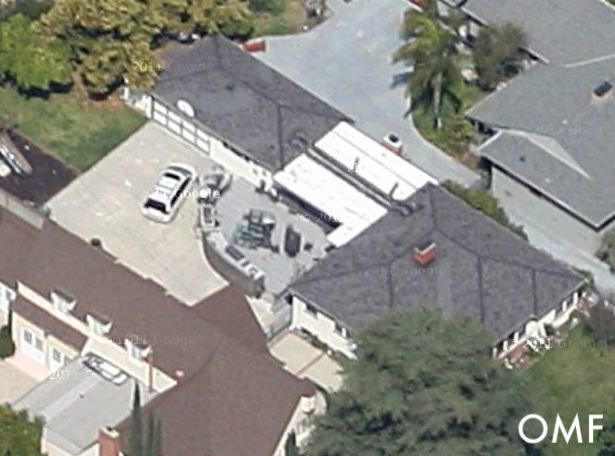
Here is the house looking down, from Google/Bing maps perspective!
I took that map and laid out our house so you could see which room was which.
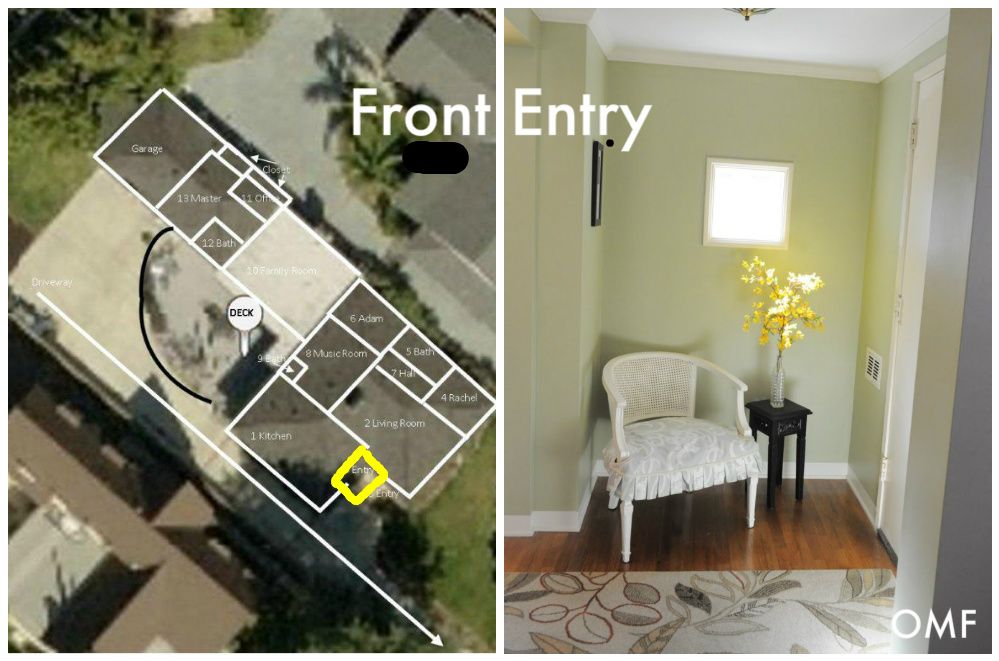
First off is our front entry. This is where you would come and I would greet you with a nice, big smile! We love having people over and so even though it's small, I've tried to make it cheery. You might remember that darling chair I re-did last year and even the paint catastrophe!
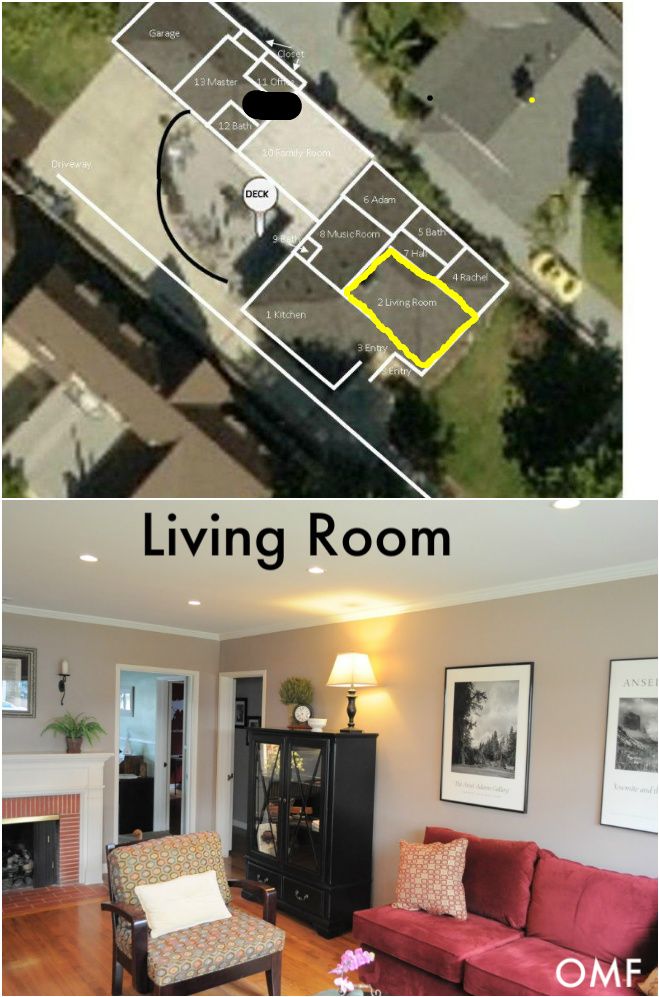
Next up is the living room. This room has a great view of the whole neighborhood with all the new windows. We use this room mainly for when we have friends over, hanging out and chatting with the family, and Bible Studies. It's a really nice-sized room and can hold lots of people. I even move all the furniture around and pull the piano in here once a year for my piano recital for my students.
If you are at the front door, you'll see right into our kitchen. It's probably not ideal for most people, but it used to be our dining room, until we tore down the wall and opened up the kitchen and dining area. Now it's wide open and welcoming, and we love it!
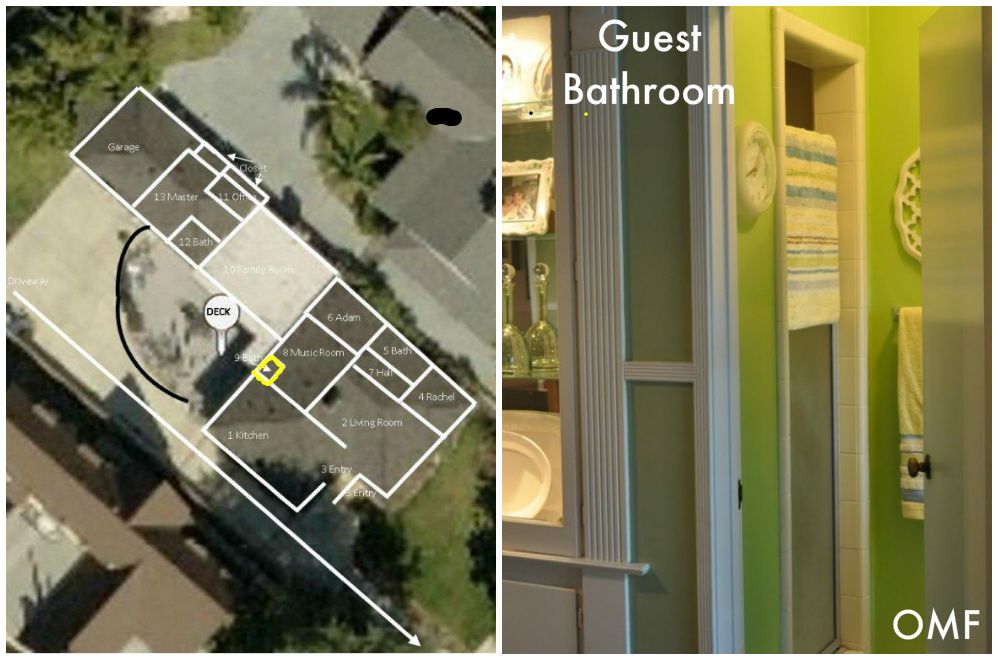
The guest bathroom is in a perfect spot right off the back entry, where the kids can go right inside the back door from playing outside and not bring all their dirt and sand from outside too far into the house when they are playing. It has a shower in there, which is rarely used and it's teeny-tiny!
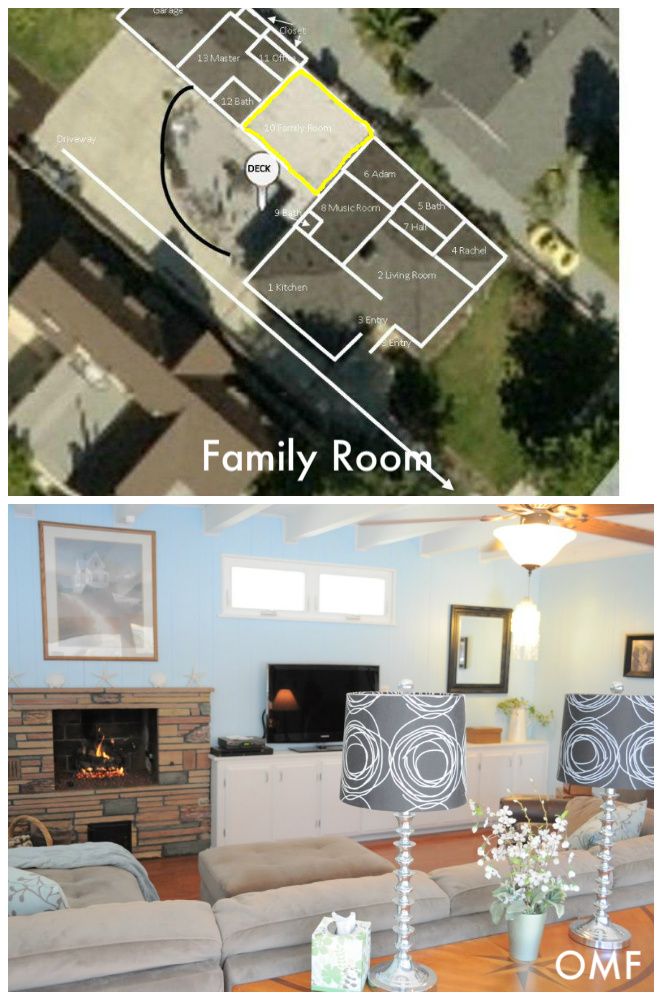
From there we enter our very favorite room - the family room! You have to go down a couple of steps {I suppose it's "sunken"}. This is where they made an addition in the 60s. It was formerly the "rumpus room" turned into a fully enclosed room. The fireplace actually was a rotisserie, which we had turned back into a working fireplace last year. It's so cozy in here and we can do so much.
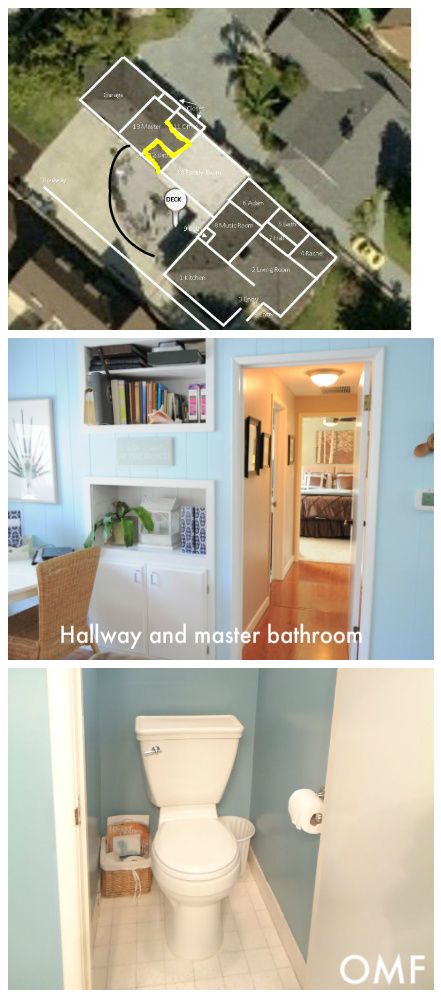
Down the hallway on the left is our master bathroom, which is small but we are thrilled to have that bathroom right next to our bedroom!
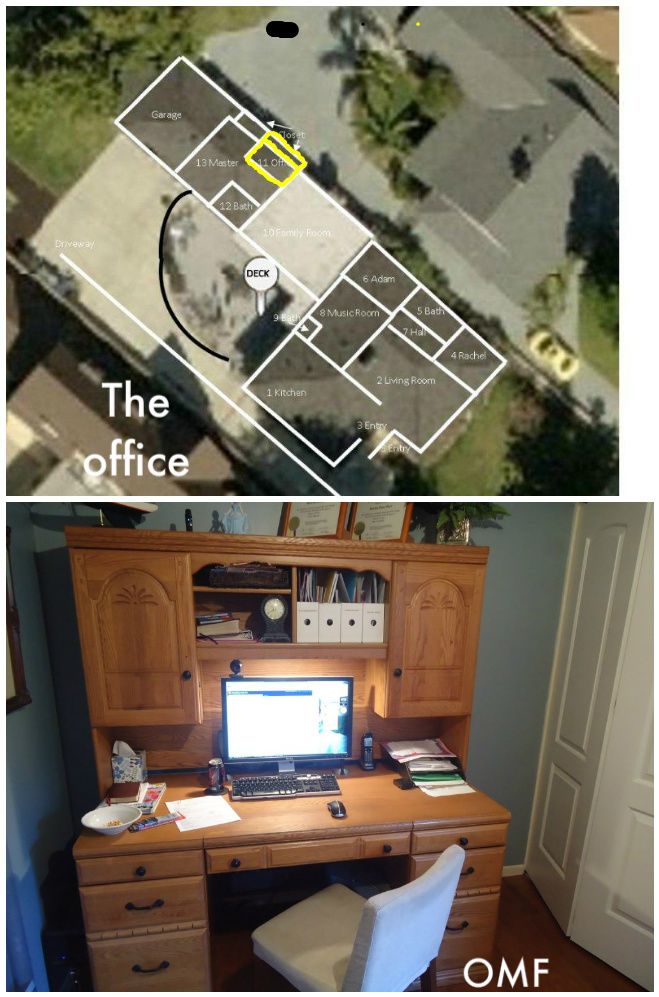
To the other side on the right, across from the master bathroom, is the office and hubby's organized closet - which is considered the fourth bedroom but would be a very small bedroom. We use this back hallway as a master suite and it's great for when he gets ready in the morning, since his closet is right across from the master bathroom - he rarely disturbs me sleeping when he gets ready.
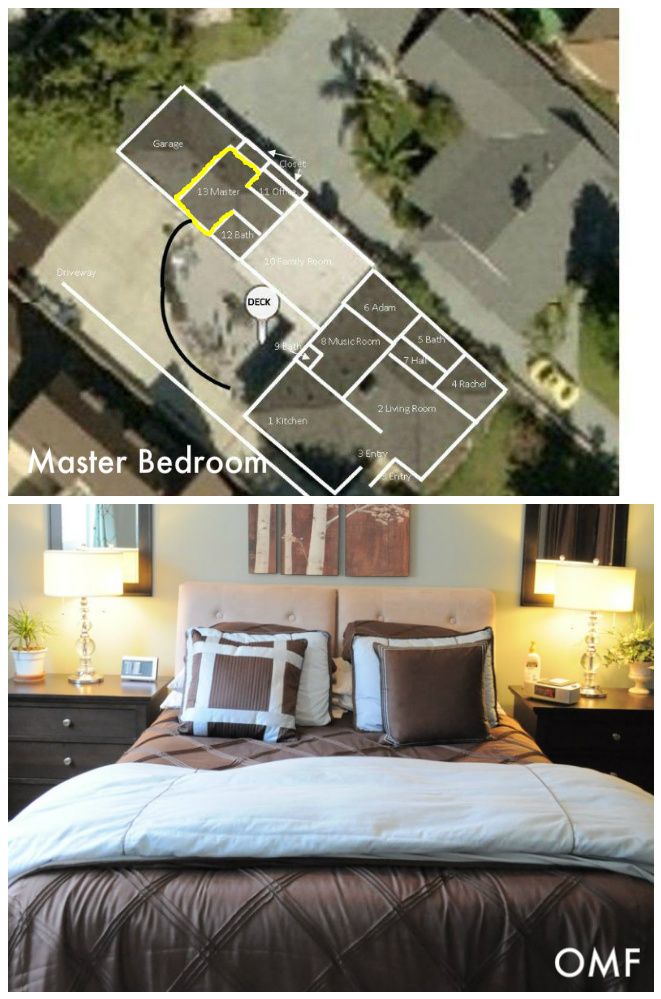
Then, at the very end is our bedroom. Yes, it's far away from the kids' rooms. It's very private and they are now big enough that if they need something they know what to do.
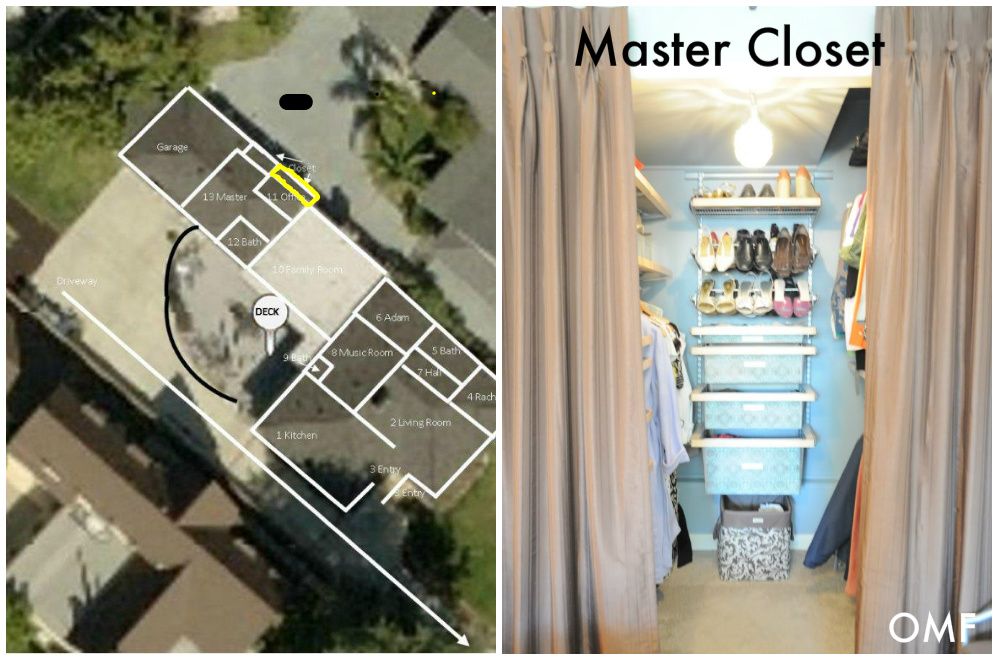
Last is my closet. Our bedroom is small, but having this closet open {the curtains don't close} really helps make the room seem bigger.
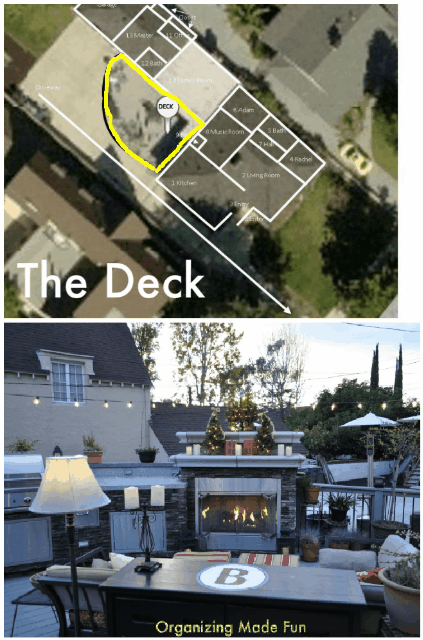
If you go back towards the family room and music room, our deck is right outside those two places. We have door in each that open up to the outside.
I want to share a few goals for our house this year that I'd like to share with you {thanks, Nester, for the inspiration}:
I hope you enjoyed the tour! The layout of our house is certainly unique. I didn't show you the basement, which is pretty rare in California. It's under the kitchen and dining room and houses the laundry and my hubby's workshop. We have other people using our home and over in our yard about 2-3 times each week. We tell our kids that this is not our home, it's the Lord's house and we use it for His glory. He has given us a great place to live and so we want to make sure that we are doing what He wants. I will be putting this layout into my "home tour" tab so you can refer back to it when I'm working on a house project and you can better understand how things are laid out! Thanks for stopping by...more organizing inspiration to come soon!
Parties:
Funky Junk Interiors
The Nesting Place
From the street our house looks small, somewhat normal sized. But it's larger than it appears. It's not a mansion or anything {just 2400 square feet} but it has this layout that when you walk through, it seems to go on and on. It's all one level, which I really like.
Here is the house looking down, from Google/Bing maps perspective!
I took that map and laid out our house so you could see which room was which.
Next up is the living room. This room has a great view of the whole neighborhood with all the new windows. We use this room mainly for when we have friends over, hanging out and chatting with the family, and Bible Studies. It's a really nice-sized room and can hold lots of people. I even move all the furniture around and pull the piano in here once a year for my piano recital for my students.
If you are at the front door, you'll see right into our kitchen. It's probably not ideal for most people, but it used to be our dining room, until we tore down the wall and opened up the kitchen and dining area. Now it's wide open and welcoming, and we love it!
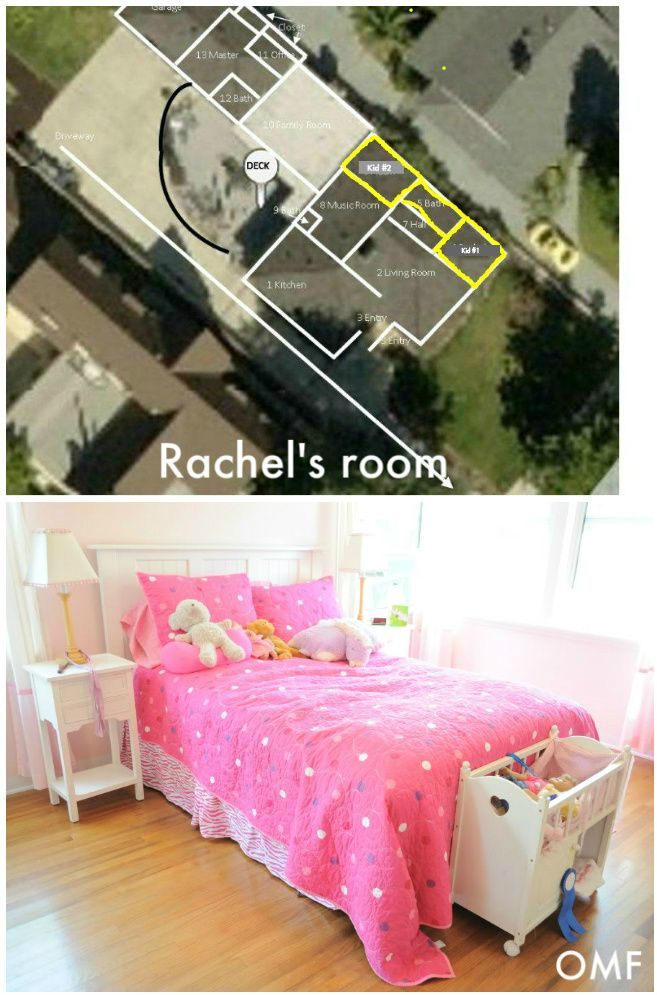
Walking through the entry and through the living room is the kids' hallway and their bedrooms. Rachel's room is a delightfully pink room right now - although she's now wanting a new color - so it's ever evolving and changing. You might remember her super organized closet we put in her room first. Her room has lots of light, too! It's beautiful.
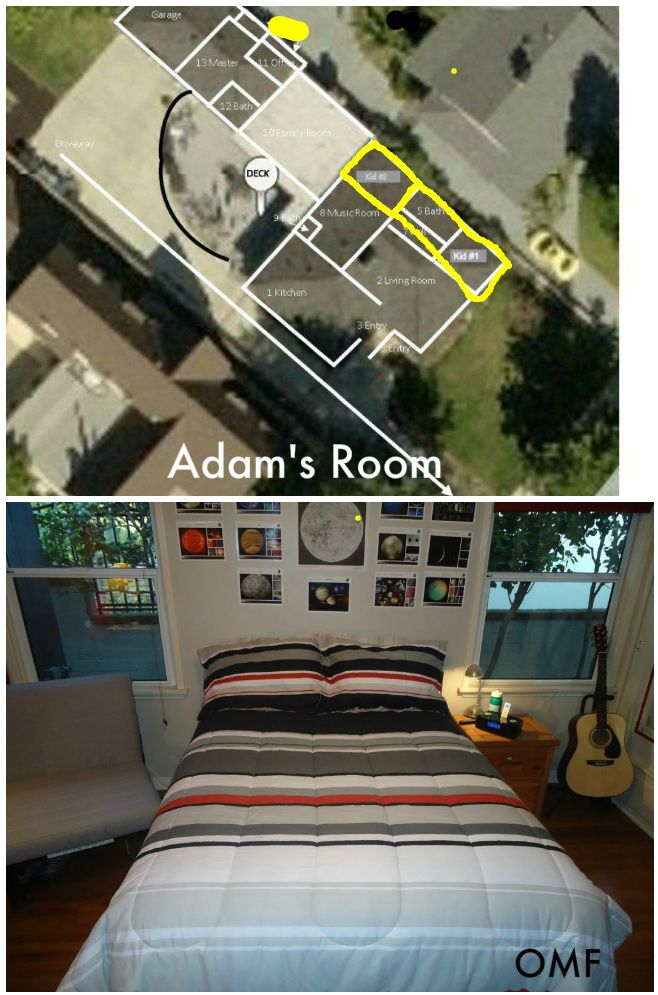
The kids' bathroom is just down the hall between each of the kids' rooms. Adam's room is at the other end. It's full of maps, red, and his super organized closet, too!
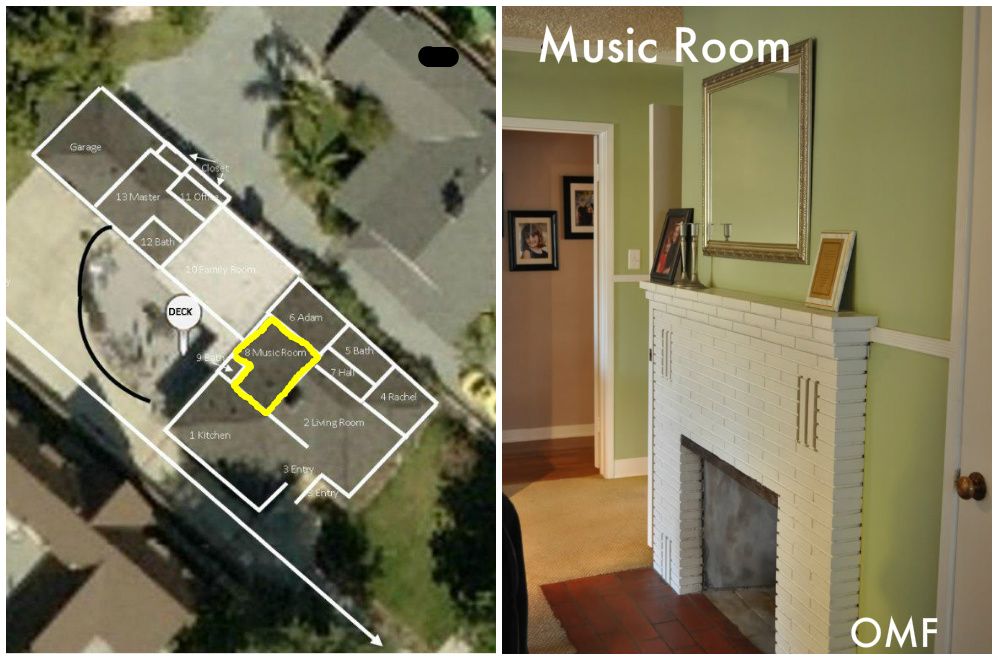
If you walk through the kitchen and to your right {past the pantry}, you enter our Music Room - which is right near Adam's room also. It's a really awkward room, so I've tried to make it as normal looking as I can. We have our back entry in here and our guest bathroom.
The guest bathroom is in a perfect spot right off the back entry, where the kids can go right inside the back door from playing outside and not bring all their dirt and sand from outside too far into the house when they are playing. It has a shower in there, which is rarely used and it's teeny-tiny!
Down the hallway on the left is our master bathroom, which is small but we are thrilled to have that bathroom right next to our bedroom!
To the other side on the right, across from the master bathroom, is the office and hubby's organized closet - which is considered the fourth bedroom but would be a very small bedroom. We use this back hallway as a master suite and it's great for when he gets ready in the morning, since his closet is right across from the master bathroom - he rarely disturbs me sleeping when he gets ready.
Then, at the very end is our bedroom. Yes, it's far away from the kids' rooms. It's very private and they are now big enough that if they need something they know what to do.
Last is my closet. Our bedroom is small, but having this closet open {the curtains don't close} really helps make the room seem bigger.
If you go back towards the family room and music room, our deck is right outside those two places. We have door in each that open up to the outside.
I want to share a few goals for our house this year that I'd like to share with you {thanks, Nester, for the inspiration}:
- My shed is a mess - really, you wouldn't believe the state it's in. {The shed is attached to our garage}. Once our new roof is put on the house, I plan to overhaul that this spring.
- I hope that putting the shed into order motivates me to do more gardening. I haven't done much since moving into this house five years ago and I used LOVE gardening. So, that's another plan.
- I have a little crafter on my hands and I'd like to make a craft cupboard/area and organize it in some way. Right now things are scattered all over the place. I'd like to come up with a way to organize and make it all efficient.
- My daughter would like to change the color of her room...which I think is fine. So, I'd like to work on that sometime this summer.
- I plan to really go through my house and clear out any clutter that isn't needed or being used. I do this regularly, but I need to keep doing it every six months or so.
I hope you enjoyed the tour! The layout of our house is certainly unique. I didn't show you the basement, which is pretty rare in California. It's under the kitchen and dining room and houses the laundry and my hubby's workshop. We have other people using our home and over in our yard about 2-3 times each week. We tell our kids that this is not our home, it's the Lord's house and we use it for His glory. He has given us a great place to live and so we want to make sure that we are doing what He wants. I will be putting this layout into my "home tour" tab so you can refer back to it when I'm working on a house project and you can better understand how things are laid out! Thanks for stopping by...more organizing inspiration to come soon!
Like what you see here? Consider becoming a follower or subscribe via email!
Parties:
Funky Junk Interiors
The Nesting Place
Friday, November 19, 2010
Family room peek...
Just a peek at our ever evolving home: our family room.
Labels:
ceiling,
family room,
floor,
furniture,
paint
Tuesday, January 13, 2015
My Best DIY Projects Ever!
I LOVE to do DIY projects. I LOVE spray paint. I LOVE to decorate and transform spaces in my home, especially. Do you? I was looking back through all my projects I've done over the last 4 1/2 years and I know that you might enjoy seeing what I've done. Perhaps you've never even seen them since you're newer to Organizing Made Fun. But, I'm a spray painting queen! Ha! I love that stuff. And, I like changing things up - I love color and patterns!
Thursday, April 10, 2014
Why is Clutter Such a BIG Deal?
A few days ago, I shared a post I saw on Good Housekeeping's Facebook page and the caption read "See how we helped bring order to this clutter home" with a picture of a room with a little clutter.
![]() |
| Via Good Housekeeping |
Friday, September 23, 2011
Silhouettes
I see beautiful silhouettes all over blogland and Pinterest! And, I must admit, I LOVE them! I just think that they bring character and charm to a home. Our family room is one room that I have tried to make very family minded - afterall, it IS a family room! I have been wanting them for our family room for awhile...
![]() |
| Source |
We vacationed earlier this summer in Big Bear. Let me tell you, it may be a small mountain town, but they have the BEST thrift stores! I seriously can't tell you how many great finds I got there! Good thing I had my van! Anyway...I found these silver trays for $1 a piece. I am a sucker for trays - LOVE trays - and I use them all the time all over the place. I especially use them for entertaining the many we have over! So, I had no idea what I'd do with them but I figured for $1 a piece it was a great deal and I'd figure it out later.
I stashed them in my office for a couple of months and completely forgot about them! My husband had piled some things on them and one day I was cleaning up I noticed them. What does that have to do with silhouettes?
I realized I hadn't thought of anything and that
I wanted some silhouettes of the kids on the walls. So, I painted
chalkboard paint on the inside of the tray, leaving the edges revealed.
It was SUPER easy - a couple of coats and I did it on my kitchen table!
Then, I took a couple of pictures of the kids' silhouettes and printed them up and cut them out. I grabbed a pencil and traced them and used my chalk ink to draw their silhouettes onto the trays. Easy peesy!
I used some Command "damage-free" hanging strips and put on the backs of the trays - which are very lite-weight.
I hung them amongst our gallery of pictures on the wall in our family room. It's so cute! I love it.
And, I can always erase them and use for something else later on! Or not!
I hung them amongst our gallery of pictures on the wall in our family room. It's so cute! I love it.
And, I can always erase them and use for something else later on! Or not!
Do you have any silhouttes of yourself or kids in your home? Aren't they so fun?
Like what you see here? Consider becoming a follower or subscribe via email!
Wednesday, May 27, 2015
Summer Tour of Homes {Organized} 2015
Welcome, if you are new here!
Today I have the privilege of joining a whole lot of amazing bloggers for home tours of all our homes - and you may have just come from seeing Donna of Funky Junk Interiors, who has such an amazing way of making rust look beautiful, and a big thank you to Gina of The Shabby Creek Cottage for hosting this awesome summer home tour.
I'd like to say that I feel that I have really created a home that is truly my style, after living in this home for nine years. I hope you enjoy my colorful, slightly "modern with a vintage twist" decor. I'm not afraid of colors or patterns. Our home was built in 1947 and I love the character, the built-ins, the closets, and all the vintage that comes from having a home from that era. Hopefully you'll also gain some ideas for an organized home too!
I want to start with the front of my home and welcome you to our beautiful, Southern California yard - all native plants, drought tolerant {we're really into green living here, if you are new here}.
Monday, January 5, 2015
How I Organized my Toddler's Toys
{This post is written by my assistant, Tiffany}
Friday, March 25, 2011
I have seen the light!
Wednesday, January 1, 2014
End of year wrap up
Happy New Year!!! Last Monday I told you about my upcoming series to help you conquer clutter and get organized! But, I have a whole year this 2013 that I did some of that, too! Can you believe the year is over? Here's a recap of ALL that went on here at Organizing Made Fun - click on any of the pictures to take you to that post.
Friday, April 5, 2013
Wednesday, September 28, 2011
How I organize: Kids computer/homework desk
OK...we took the last couple of months off from my regular Wednesday "how I organize" to do a lot of Back to School prepping and organizing. Now we'll dive back into my family room to show you some more areas that I've organized. The family room is one of those places that everyone congregates in our house. Our kitchen is actually in the front of our house and the family room is in the middle area. We have a one-story L-shaped house {about 2400 square feet}.
I want to show you an area I "created" a few years ago. I found this great slim, adjustable desk at Overstock.com - it's got adjustable legs which I liked for the kids. It can have two kids sit at once there. Our kids' computer is here - out in the open, where everyone can see what they are doing {this is extremely important for parents NOT to have computer/TV in their rooms where you cannot monitor what they see}.
We DO have them wear headphones cause their websites are not something we all need to hear! They also have a time limit on there, along with safety software {we use a program called Safe Eyes} so they can only go on websites with prior approval and access from the administrator {that would be ME!}.
I have a few dilemmas in this area. But, my main one was the cords! I really do hate cords dangling and a mess. Isn't it just one of those things you can't stand but seem to have to put up with?
So, I took some of my hubby's cool velcro {remember I did that in our entry dresser?} and started to work on the cords.
Let me just say, cords are AWFUL! AWFUL, AWFUL, AWFUL! It was one of the hardest things I've ever organized! They were all different lengths, widths, and wanted to go one way or another. This table is great, but you can't just shove the cables somewhere to hide them!
My hubby does I.T. for a living, so I have DEEP appreciation for him now and for dealing with cords. I told him, too, that I just don't know how he does it! OK...so by the time I got those looking somewhat organized {and sort of pathetic}, then I took the large power strip and strapped it to the table leg. It was previously on the floor and the kids kept kicking it and it would turn off or scrape the wall, so this way seemed like a better idea!
My hubby recently bought the kids a Mini-Mac and so there is not a big box on the floor anymore! Yay! This is much less of a dust collector and just does a perfect job for them to work on. {Yes, Mini-Mac next to a Dell monitor!}
The other problem I had was there are no drawers in the desk to store things and so I bought this cart {years ago} from The Container Store when their Elfa systems were on sale. So, I have them labeled and more access for homework items - paper, pencils, rulers, etc.
The little tray on top was a quick project I did - on the cheap! I bought the tray at the thrift store on "half-off" day for $1.15! Here is my Pinterest inspiration:
I spray painted it with black paint I had in my paint cupboard, then found some jars left over in my overflow pantry, and sorted out all the coloring pencils, pens and markers.
Another dilemma I had previously was seating, so I bought these cute stools {at Kmart.com, but I don't think they make this low height anymore, so look at Ikea.com} since having chairs there took up too much space. The stools are fairly comfortable - but not something you'd want to sit on for hours {which is the point!} and slide under the table and out of the way. I can also slide them over to use elsewhere in the room, if needed.
So there you have it! Our little computer desk area! I didn't do all this at once, but a little bit at a time to come up with the best solution as problems arose! Do you have a computer desk area in a public part of your house for you and/or your kids? What solutions have you come up with? Do you have time limits for them on the computer?
Like what you see here? Consider becoming a follower or subscribe via email!
Parties:
Delightful Order
Tidy Mom
Organizing Junkie
Funky Junk Interiors
I want to show you an area I "created" a few years ago. I found this great slim, adjustable desk at Overstock.com - it's got adjustable legs which I liked for the kids. It can have two kids sit at once there. Our kids' computer is here - out in the open, where everyone can see what they are doing {this is extremely important for parents NOT to have computer/TV in their rooms where you cannot monitor what they see}.
We DO have them wear headphones cause their websites are not something we all need to hear! They also have a time limit on there, along with safety software {we use a program called Safe Eyes} so they can only go on websites with prior approval and access from the administrator {that would be ME!}.
I have a few dilemmas in this area. But, my main one was the cords! I really do hate cords dangling and a mess. Isn't it just one of those things you can't stand but seem to have to put up with?
So, I took some of my hubby's cool velcro {remember I did that in our entry dresser?} and started to work on the cords.
Let me just say, cords are AWFUL! AWFUL, AWFUL, AWFUL! It was one of the hardest things I've ever organized! They were all different lengths, widths, and wanted to go one way or another. This table is great, but you can't just shove the cables somewhere to hide them!
My hubby does I.T. for a living, so I have DEEP appreciation for him now and for dealing with cords. I told him, too, that I just don't know how he does it! OK...so by the time I got those looking somewhat organized {and sort of pathetic}, then I took the large power strip and strapped it to the table leg. It was previously on the floor and the kids kept kicking it and it would turn off or scrape the wall, so this way seemed like a better idea!
My hubby recently bought the kids a Mini-Mac and so there is not a big box on the floor anymore! Yay! This is much less of a dust collector and just does a perfect job for them to work on. {Yes, Mini-Mac next to a Dell monitor!}
The other problem I had was there are no drawers in the desk to store things and so I bought this cart {years ago} from The Container Store when their Elfa systems were on sale. So, I have them labeled and more access for homework items - paper, pencils, rulers, etc.
The little tray on top was a quick project I did - on the cheap! I bought the tray at the thrift store on "half-off" day for $1.15! Here is my Pinterest inspiration:
I spray painted it with black paint I had in my paint cupboard, then found some jars left over in my overflow pantry, and sorted out all the coloring pencils, pens and markers.
Another dilemma I had previously was seating, so I bought these cute stools {at Kmart.com, but I don't think they make this low height anymore, so look at Ikea.com} since having chairs there took up too much space. The stools are fairly comfortable - but not something you'd want to sit on for hours {which is the point!} and slide under the table and out of the way. I can also slide them over to use elsewhere in the room, if needed.
So there you have it! Our little computer desk area! I didn't do all this at once, but a little bit at a time to come up with the best solution as problems arose! Do you have a computer desk area in a public part of your house for you and/or your kids? What solutions have you come up with? Do you have time limits for them on the computer?
Delightful Order
Tidy Mom
Organizing Junkie
Funky Junk Interiors
Labels:
cheap-O,
desk,
family room,
Kids,
organize
Subscribe to:
Posts (Atom)