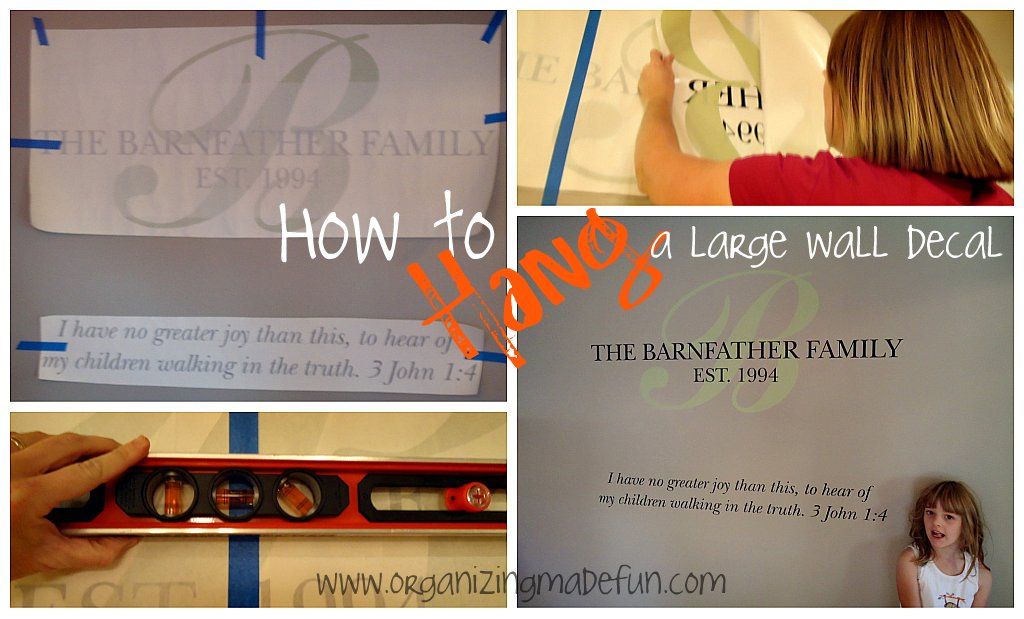
So, I have a very bare wall left in our new kitchen. So, I filled it with a gorgeous, custom decal for the wall. Look at it. It's beautiful!

I got this decal from Stephen Edward Graphics, on Etsy (he was GREAT to work with - fast, efficient, and very reasonable). In general, I have to say that all my Etsy transactions have been super. I have had courteous, kind, and very professional sellers. I highly recommend going there for unique and fun gifts and things (especially decals)!
Anyway, here is a little "how-to" of what I did and how I did it. I had heard from another blogger (I can NOT remember who, so if it's you - thank you) that putting up decals is a SLOW and patient process. I also asked another friend of mine and she gave me some great tips, along with my instructions that came with the decal. So, I will do my best to show you how easy it was. I did it all by myself - no help! I am NOT a perfectionist - I am an "eye baller". My husband is the one who usually gets out the tape measure and level for hanging every picture - me, I just look at it and say "yep, that's the spot".
So, first I took out each decal and figured out where the middle of each was and marked that. I also figured out the approximate place I wanted it hung on the wall based on what I had in the kitchen and where it would look best - I DID measure it for the middle of that, though!
Next I hung both up and just looked at them while I was eating dinner to make sure I was happy with where I put them - I was!
So, then, once I was happy with it, I marked everything on the wall so I could replace it later. I had to take it off the wall and turn it upside down and take the plastic burnishing tool (this came with the decal I ordered), and you just scrub the snot out of it - rubbing all the letters and pictures. Do this a lot...you'll be tired, but you are pushing the lettering, causing the letters to go onto the other side of the paper getting it ready to go on the wall.
I hung it back up on the wall, checking to make sure it was level....then I put tape vertically (as pictured). I drew, in pencil, a level line going under the "The Barnfather" to use as a measurement for whether it was level or not.
Then, you will separate the two papers. It is suggested that you pull it back to your first vertical tape and then you cut the back paper off. When you lay the other side back down, it will stick to the wall. Then, you must rub and rub and rub the lettering. When you begin to peel it, if the lettering doesn't stick to the wall then you lay it back down and rub some more....go SUPER SLOW and be VERY PATIENT as you pull the paper back!!
So, you can see that I continued this on down, doing that next section the same way.
However, it got trickier when I got to the two color overlay (this picture is taken by my daughter, since hubby was working late - that's why it's low and blurry). GO SLOW....
This is why I decided to go to the otherside....good plan!
And it was much easier...
And I finished it off that way without a hitch!
Purdy!
I did the smaller decal exactly the same way, only it was actually easier because it didn't have the overlay. It went up without a hitch!
Easy! This picture gives you a good idea how you move down and cut the backing off and then put the sticky part down.
Done! I did it alone, so if I can do it alone I'm sure you can too! I apologize if this was a long post....but if you ever get a decal, you'll be glad it was!


Like what you see here? Consider becoming a follower or subscribe via email!
Join me on Facebook - where we interact and have lots of great fun. You can also see behind the scenes pictures and fun stuff I do on my Instagram!
There are some products that are linked to my Amazon affiliate link.


Good tips, especially about the scrubbing! That was the hardest part for me. I am not good at measuring laying stuff out. :s Thanks for linking up with me. :)
ReplyDeleteI adore vinyl decals, but I've only actually put up one and it was a huge pain in my...shoulder. Thanks for tips for when I do it again. My last one didn't have the two seperate papers so this is very useful. Thanks!
ReplyDeleteGreat tips! I have been afraid of large vinyl decals, definitely going to have to try it now!
ReplyDeleteGreat tips! I haven't tried any decorating with vinyl. I like what you did.
ReplyDeleteThanks for the tips! Your comment was above mine on The Nesting Place so I came over for a visit, and I'm glad I did! I really like your blog. I'm your new follower
ReplyDeleteI love this. Absolutely beautiful. I have a huge blank wall too. . .may have to think about doing this. . .:) Thanks for all the pictures and steps.
ReplyDeleteAbsolutely lovely. I would like to use some of these in my next home, but had no idea it was such a slow process.
ReplyDeleteI actually put up a vinyl decal this evening and I wish I had seen your post first. It wasn't quite the size of yours, but I am not the most patient person and it drove me crazy for my lettering to stick to the paper instead of the wall!
ReplyDeleteI'm a new follower from www.workingonthesimplelife.blogspot.com
Frances...I'm sorry you had trouble. It DOES take patience which I am also not the most patient person, but I persisted! I even did one in my son's room, too!
ReplyDeleteBecky B.
Love this idea! I have the perfect wall for it too!! :) Thanks for sharing.
ReplyDeleteHi again..was wondering if you had another link to the etsy shop where you purchased your transfers? When I clicked on your link it did not find it. :(
ReplyDeletePamela - Try this:
ReplyDeletehttp://www.etsy.com/shop/StephenEdwardGraphic
Love it!! We have a very large mirror on the landing of our stairway...and I want to put a decal there. I'll be keeping this post handy for when I start...(and for whom to order the decal as well.)
ReplyDeleteI love it! We have a very large mirror on the landing of our stairway...and I've wanted to put a decal on it. Thanks for the tips on how to apply. Now...I just have to decide on what it is that I want it to say...hmmmmm. (Also, thank you for the source for those vinyl decals.)
ReplyDelete