Well, we've been busy getting the kitchen updated since July. Yep, it's taking awhile, but progress is progress! I have VERY little counter space. So, this buffet had been sitting in our entryway (which fit perfectly there) for the last four years. I moved it into the kitchen once we tore the wall down.
It's not bad, really. I even spray painted the gold handles to black many years ago. But, it just wasn't really what I wanted. So, here's what I did.
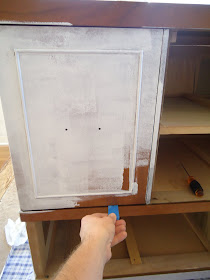
I took some liquid sandpaper/deglosser and some gloves and a rag. I wiped down the whole thing to get the finish roughed up. Keep in mind that this piece is wood, but has a veneered wood on top of that wood.
I made sure to remove everything and pull the drawers out. Also, the deglosser is a little smelly (it's not terrible) so make sure you ventilate the area.
So, I confess that I tried painting the black right on the veneer after deglossing it. Guess what? It wiped right off! So, a coat of primer did the trick!
Yep, gotta love primer! Once that was done I began one of many coats of high gloss black paint!
One trick when painting a door...put a piece of tape inside and then double side it underneath (as shown above) so you can pull it open again to paint on the sides of the door and get in and out!
In the meantime, I took a rice krispy box and put one screw for each handle through the cardboard and attached one side of the handle so I can move it around and they wouldn't fall off.
So, I spray painted them a metallic silver!
And yes, here I am painting the third coat of the high gloss black just before bedtime...I wanted it to cure so I could put it all back together the next day. As much as I enjoy a project, I definitely enjoy having everything put back together as soon as possible.
BUT....I wasn't done yet. I actually planned to use some FREE granite that I got - but it was in several pieces and the contractor who helped with our drywalls in our kitchen looked at it and said it wasn't worth the effort. So, I took the plunge and went and got a remnant piece of carrera marble for my buffet. And here, is the result:
So, here is a before and after shot:
And here's a close up of the carrera marble top:
See the rest of my kitchen!
It's my knock off to this Pottery Barn buffet, although I like mine better with the marble top!
Also linking to:
Miss Mustard Seed
CSI project
Like what you see here? Consider becoming a follower or subscribe via email!
Join me on Facebook - where we interact and have lots of great fun. You can also see behind the scenes pictures and fun stuff I do on my Instagram!
There are some products that are linked to my Amazon affiliate link.


Ooh, wow!!! So pretty in the "After" shots. What a great job! :) Thanks for linking up with me. :)
ReplyDeleteWow!! LOVE it!! One of the nicest transformations I've seen :) KLB
ReplyDeleteYour buffet is BEAUTIFUL! I love the marble top - it just makes it!
ReplyDeleteWhat a transformation! I love the marble. Have a great weekend!
ReplyDeleteOh Becky it is GORGEOUS!!!!!! I can't believe you did that! It is amazing!!!
ReplyDeleteVery nice! The granite on the top makes this look like a high dollar piece.
ReplyDeleteWOW! That looks AMAZING! I love it! You did such a great job. Love the addition of the marble. Looks very expensive and beautiful!
ReplyDeleteYou did an AWESOME job! LOVE that marble top!
ReplyDeleteStopping by from Amanda's Party!
serious wow factor.
ReplyDeleteAmazing! I have been stalling painting an oak kitchen table to black but have heard horror stories that you can't get a smooth surface. Did you have this problem too? What type of primer and paint did you use and did you do a top coat of poly? Did you roll everything or used a brush too?
ReplyDeleteThanks for the post and any advice would be greatly appreciated.
stephanie fullofgreatideas@gmail.com
Really nice! And fab tips you've given too :-)
ReplyDeleteWhere did you get the deglosser? I've been wanting to try that.
Jessica - I get my deglosser at the local hardware store in the paint stripping area - at OSH. Just ask your paint department and they can help you find it!
ReplyDeleteBecky B.
Wow, what a difference!! You did a great job, thanks for sharing with us all!
ReplyDeleteCarol in GA
Great job Becky :)
ReplyDelete